Utilizing the adaptable and creative craft of tufting, DIY enthusiasts can produce stunning upholstered furniture and one-of-a-kind wall art. A tufting gun, tufting starter kit, and tufting yarn can help you realize your artistic vision. Tufting is a skill that, like any other, requires practice and close attention to detail to achieve the best results. This comprehensive guide will cover common mistakes to avoid when using a tufting gun, as well as helpful tips to ensure your tufted projects turn out beautifully.
Understanding the Tufting Process
Before we dive into the typical mistakes, let’s quickly review the tufting process and the required tools:
Tufting Techniques
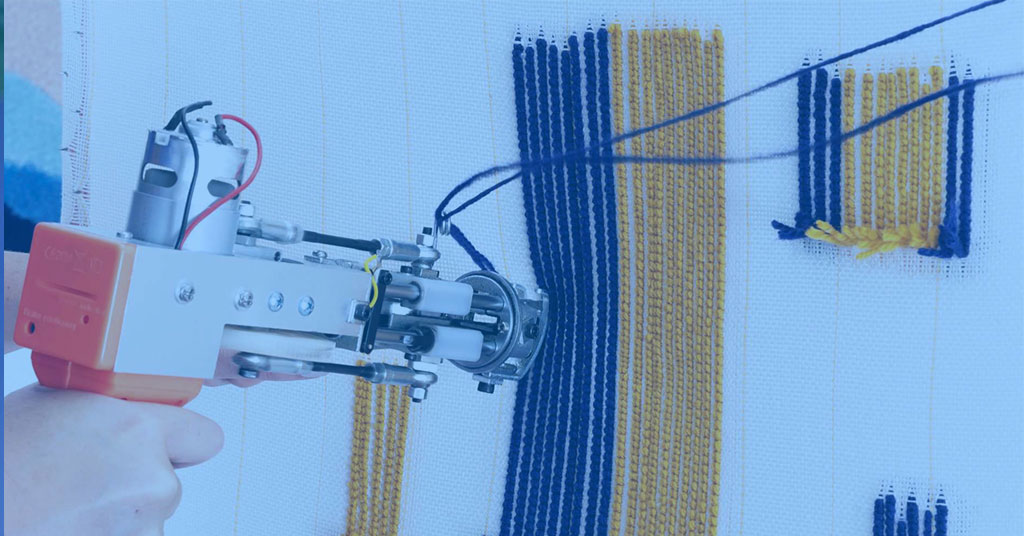
To create patterns or designs on fabric, yarn loops are woven into the fabric and secured with knots or stitches. The process is automated by the tufting gun, which makes it faster and more efficient than traditional hand-tufting methods.
To begin tufting, you’ll need a starter kit, which typically consists of the tufting gun, yarn, and other required supplies. The tufting gun works by driving a needle through the fabric, wrapping yarn around it, and then pulling the needle back through the fabric to create a tufted stitch.
The Essential Tools
Tufting Gun:
The tufting gun is the main player in the process of tufting. This portable tool automates the tufting process, which makes it faster and more efficient than traditional hand tufting methods. To make a tufted stitch, the yarn is looped around the needle and pulled back through the fabric when the trigger is pulled. The tufting gun’s needle can be used to pass the fabric backing through.
Tufting weapons come in numerous types and models, each with a distinct set of features and abilities. In addition, some tufting guns have needles that can be switched out to accommodate different yarn densities. Other machines have adjustable stitch length and speed settings. When selecting a tufting gun, factors like simplicity of use, robustness, and compatibility with different tufting yarns should all be taken into account.
Tufting Yarn
Specialized tufting yarn is produced for tufting projects. It comes in a wide range of colors and thicknesses to suit various design preferences. Tufting yarn typically tends to be stronger and more resilient than regular yarn because of the tension and pulling required for the process.
When choosing yarn for tufting, consider its thickness, color, and texture. Thinner yarn tufts seem more delicate and intricate, while thicker yarn tufts are more pronounced and bold. To achieve the look you desire for your tufted project, experiment with different yarn color and pattern combinations.
Fabric Backing
For the design, the fabric backing serves as a white canvas. It can be upholstery fabric for tufting furniture or canvas fabric for tufted wall art. For your tufted project, choosing the right fabric backing is crucial because it can affect the project’s appearance, durability, and overall success.
For upholstery projects, pick fabric with a tight weave and the right thickness to guarantee a flat and level surface for tufting. Materials that are loosely woven may produce tufted stitches that are uneven and a less-than-stellar final product.
Needles and Thread
Along with the tufting gun, some steps of the tufting process may also call for the use of hand-sewing needles and thread. Although the tufting gun automates most of the process, hand-sewing needles can be useful for tying off loose ends and adding finishing touches.
You can finish tufted stitches and tie knots for a polished, seamless appearance using premium thread that matches the hue of the tufting yarn.
Scissors
Scissors are an essential tool for tufting projects because they can be used to trim tufted loops and cut yarn. Sharp scissors ensure precise finishing and clean cuts, improving the overall appearance of your tufted design.
Make sure you have a good pair of scissors on hand to handle any cutting or trimming tasks before beginning your tufting project. Now that we have a basic understanding of the tufting process and tools, let’s look at some common errors to avoid guaranteeing the quality of your tufted projects.
Common Mistakes to Avoid When Using a Tufting Gun
Skipping the Practice Phase
One of the most frequent errors made by novices is jumping right into a major tufting project without having had enough practice. Although using a tufting gun can make the process easier, tufted stitches must still be executed with consistency and finesse.
It’s essential to practice tufting on scrap fabric for some time before beginning a bigger project. You can become accustomed to the pressure and speed of the tufting gun through practice, and you can also improve your technique for making tufted stitches that are evenly spaced.
During the practice phase, try different yarn thicknesses and experiment with various stitch lengths to understand how they impact the overall appearance of the tufts. Additionally, practice on different fabric backings to see how the tufting gun interacts with each type of fabric.
Ignoring the Fabric Backing Quality
The fabric backing plays a critical role in the success of your tufting project. Choosing the right fabric is essential to achieve clean and durable tufted stitches. Unfortunately, some beginners may overlook the importance of fabric quality, leading to disappointing results.
For upholstery projects, opt for upholstery fabric with a tight weave and appropriate thickness. Loosely woven fabrics can cause tufted stitches to pull through the fabric or appear uneven. Consider the fabric’s durability as well, especially for furniture pieces that will be frequently used.
When creating tufted wall art, canvas fabric is a popular choice due to its sturdiness and ability to hold tufted stitches securely.
Before beginning your project, stretch the fabric tightly over the frame or furniture piece to create a smooth and even surface for tufting. Properly preparing the fabric backing will set the foundation for a successful tufting experience.
Using the Wrong Tufting Yarn
Selecting the right tufting yarn is crucial to achieving the desired look for your tufted project. Some beginners may make the mistake of using regular yarn or yarn that is not suitable for tufting, which can lead to frustration and unsatisfactory results.
Tufting yarn is specially designed for tufting projects, and it is stronger and more durable than regular yarn. It can withstand the tension and pulling involved in the tufting process without fraying or breaking.
When choosing tufting yarn, consider the thickness and texture of the yarn. Thicker yarn creates bolder and more pronounced tufts, while thinner yarns allow for more intricate and delicate designs. Experiment with different yarn colors and combinations to achieve the desired effect for your tufted project.
Not Securing Knots Properly
Properly securing knots is essential to ensure that tufted stitches remain in place and do not come loose over time. Some beginners may overlook this step or fail to secure knots tightly enough, leading to tufts that unravel or become uneven.
After creating each tufted stitch, make sure to pull the yarn tight and secure the knot with a double or triple knot. This will prevent the knot from slipping and ensure that tufts stay in place even with regular use.
Overcrowding Tufts
In the excitement of tufting, beginners may make the mistake of overcrowding tufts too closely together. This can result in tufts bunching up and overlapping, making the design look messy and uneven.
To avoid overcrowding, plan the placement of tufts carefully. Leave enough space between tufts to create a clean and organized design. Remember that spacing between tufts can affect the overall visual appeal of your tufted project.
Ignoring Knot Placement on Furniture
When tufting furniture, it’s essential to consider the placement of knots on the fabric backing. Knots should be positioned in inconspicuous areas or places where they won’t be in direct contact with users or surfaces.
Avoid placing knots on the front or top surfaces of furniture, as they can be uncomfortable for users and may wear down the fabric over time.
Rushing the Tufting Process
Tufting requires patience and attention to detail. Rushing through the tufting process can lead to uneven stitches, knots coming loose, and mistakes in the overall design.
Take your time, especially when creating intricate patterns or designs. Remember that tufting is a skill that improves with practice and careful execution. Enjoy the process and take pride in the craftsmanship of each tufted stitch.
Not Maintaining the Tufting Gun
The tufting gun is a precision tool that requires proper maintenance to function optimally. Neglecting to clean and lubricate the tufting gun regularly can lead to jamming, misfiring, and uneven tufted stitches.
After each use, clean the tufting gun thoroughly according to the manufacturer’s instructions. Lubricate the moving parts with the recommended oil to ensure smooth operation. Regular maintenance will prolong the life of your tufting gun and ensure consistent results.
Not Considering Yarn Colors
Choosing the right tufting yarn colors is essential to create a visually appealing design. Not considering yarn colors or failing to plan the color scheme can result in a tufted project that lacks cohesion or clashes with the surrounding decor.
Before starting your tufting project, carefully select a color palette that complements the overall theme of the space where the tufted piece will be displayed. Consider how the colors will interact with each other and the impact they will have on the overall aesthetic.
Overlooking Safety Precautions
While tufting is a rewarding craft, it involves the use of sharp needles and tools. Always prioritize safety by wearing appropriate protective gear, such as gloves and safety glasses, when using the tufting gun.
Keep the tufting gun out of the reach of children and store it in a secure location when not in use. Additionally, read and follow the manufacturer’s safety guidelines and instructions for using the tufting gun.
Conclusion
The art of tufting is a delightful and creative craft that allows DIY enthusiasts and artisans alike to transform fabric into stunning tufted masterpieces. While the tufting process can be enjoyable and rewarding, it’s essential to be aware of common mistakes that beginners may encounter. By understanding these pitfalls and following best practices, you can enhance your tufting skills and achieve impressive results in your tufting projects.
One of the most critical steps in the tufting process is to practice on scrap fabric before diving into significant projects. Practicing helps familiarize you with the tufting gun’s pressure, speed, and handling, allowing you to perfect your technique and create even and properly spaced tufted stitches. Taking the time to practice can significantly impact the overall quality of your tufted designs.
The fabric backing used in tufting plays a vital role in the success of your projects. Choosing the right fabric is crucial to achieving clean and durable tufted stitches. For upholstery projects, select upholstery fabric with a tight weave and appropriate thickness to ensure a smooth and even surface for tufting. For tufted wall art, canvas fabric is an excellent choice due to its sturdiness and ability to hold tufted stitches securely.
Selecting the appropriate tufting yarn is equally important in achieving the desired look for your tufted projects. Tufting yarn is specifically designed for this craft and is stronger and more durable than regular yarn. It comes in various colors and thicknesses, allowing for endless creative possibilities. Experiment with different yarns to see how they impact the appearance and texture of your tufted designs.
Properly securing knots is essential to ensure that tufted stitches remain in place and do not come loose over time. After creating each tufted stitch, pull the yarn tight and secure the knot with a double or triple knot. This will prevent the knot from slipping and ensure that tufts stay in place even with regular use.
Avoid overcrowding tufts too closely together, as this can lead to bunching and overlapping, resulting in a messy and uneven design. Plan the placement of tufts carefully, leaving enough space between them to create a clean and organized look.
When tufting furniture, consider the placement of knots on the fabric backing. Avoid placing knots on the front or top surfaces of furniture, as they can be uncomfortable for users and may wear down the fabric over time.
Patience is key when tufting. Rushing through the process can lead to uneven stitches, knots coming loose, and mistakes in the design. Take your time, especially when creating intricate patterns or designs. Remember that tufting is a skill that improves with practice and careful execution.
Regularly maintaining your tufting gun is crucial to its optimal performance. Clean the tufting gun thoroughly after each use and lubricate the moving parts with the recommended oil. Proper maintenance will ensure smooth operation and consistent results.
When choosing tufting yarn colors, consider how they will interact with each other and the overall impact they will have on your tufted design. Select a color palette that compliments the theme of the space where the tufted piece will be displayed.
Lastly, always prioritize safety when using the tufting gun. Wear appropriate protective gear, such as gloves and safety glasses, to prevent injuries. Store the tufting gun in a secure location when not in use and keep it out of the reach of children.
By avoiding these common mistakes and following these tips, you can embark on a successful tufting journey and create stunning tufted upholstery, wall art, and other decorative pieces that add a touch of elegance and craftsmanship to your home decor.
Remember, tufting is an art form that allows you to unleash your creativity and express your unique style through fabric. Embrace the process, learn from your mistakes, and celebrate the beauty of each tufted stitch. With practice and dedication, you’ll be well on your way to becoming a tufting maestro and creating breathtaking tufted designs that leave a lasting impression on all who behold them. Happy tufting!
