
Many tufting lovers face a common problem: their tufting cloth rips. This can ruin designs and waste lots of time. A key fact to know is that solving the ripping problem in tufting needs simple fixes.
This article will show how to fix those tears and keep your work looking great. You’ll learn why fabric tears, how to prevent it, and ways to repair any damage. Read on for solutions to the ripping problem in tufting.
The Issue of Ripping in Tufting Cloth
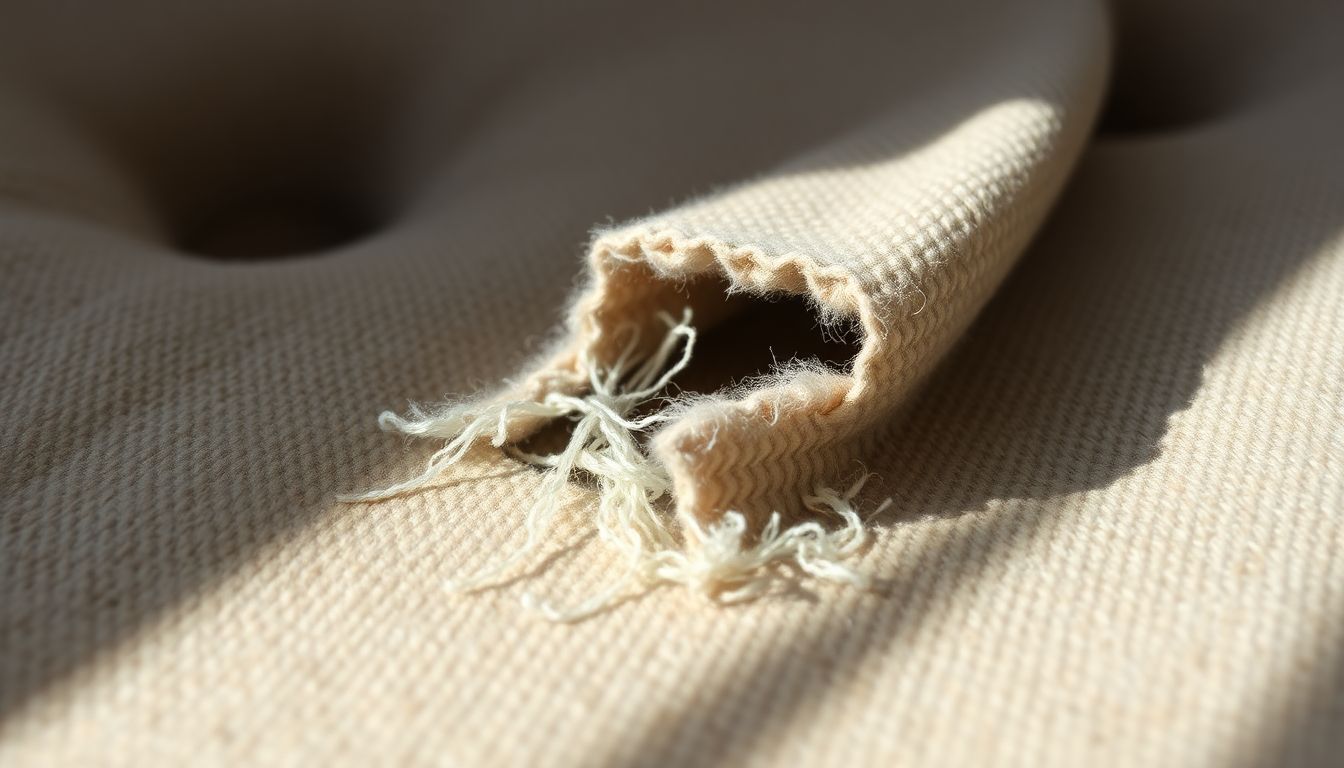
Ripping in tufting cloth creates unattractive voids that ruin the fabric’s appearance. To tackle this problem, one needs to understand and apply effective solutions.
Unattractive voids in tufting fabric
Holes and gaps in tufting fabric can ruin a design. These unattractive voids waste time and materials. They turn what should be beautiful work into something unusable.
Encountering voids often results in wasted time.
Artists find these flaws frustrating because they aim for perfection in their creations. Voids make the piece look incomplete and flawed, which is disappointing to any tufting lover who has spent hours working on a project.
Solutions to prevent ripping
Unattractive voids in tufting fabric can ruin a project. Solutions to prevent ripping are crucial for any tufting lover to know.
- Choose high-quality thread and fabric that can withstand the tufting process better.
- Wrap the fabric on the frame with consistent tension to avoid loose areas that can tear.
- Set your tufting gun to a moderate speed to reduce the chance of making holes too quickly.
- Apply even pressure when using the tufting gun, avoiding pushing too hard in one spot.
- Move the gun steadily across the fabric, so you don’t strain and tear it by focusing too long in one area.
- Practice on scrap pieces before starting on your main project to get used to these techniques.
- Check your work often for small tears that can be fixed easily before they become bigger problems.
These steps help keep your tufting projects looking great without unsightly rips or tears.
Reasons for Holes in Tufting Cloth
Holes in tufting cloth can ruin a rug’s look. They come from mistakes like using weak fabric or the wrong gun speed.
Poor quality thread or fabric
Choosing low-grade thread or thin fabric is a common mistake for those new to tufting. These materials can easily tear, leading to holes in the tufting cloth. It’s crucial to pick strong thread and durable fabric to avoid these issues.
From personal experience, using substandard material always results in extra repair work later.
Artists should look for high-quality supplies from the start. This step prevents tearing and saves time on fixing damages. Strong threads and thick fabrics make tufting smoother and more enjoyable.
Improper tension when wrapping the fabric
Wrapping fabric with the wrong tension often leads to holes. This mistake can ruin a tufting project fast. Samuel found that correct fabric tension is key to avoid tears. He learned to assess tension by feel and look, ensuring it’s even across the frame.
This step saves time and materials.
Samuel teaches others this technique too. He shows them how to pull the fabric tight, but not too tight. If it’s loose, the yarn might not catch well. Too tight, and the fabric could rip when tufting starts.
Finding this balance prevents damage before it happens, making for smoother tufting sessions.
Excessive speed setting on the tufting gun
Setting the tufting gun to a high speed can cause problems. It makes the user move too fast across the canvas. This often leads to ripping in the cloth. Samuel Davity found this out while working on several pieces.
He noticed that by slowing down, he could prevent tearing and improve his work’s quality.
Using a speedy tufting gun seems like it would save time, but it doesn’t help if you keep ripping your material. You have to go back and fix these mistakes, which takes more time in the end.
Learning from his experience, Davity suggests taking your time with each pass of the gun for better results.
Inadequate pressure applied when using the tufting gun
Using the tufting gun with not enough power is a common mistake. It can lead to holes in your tufting cloth because the yarn doesn’t go through well. Samuel Davity, from his experiences at Urban Tufting, sees this often.
He stresses that keeping pressure steady is key to avoid rips.
Consistent pressure throughout the process ensures a smooth and tear-free tufting experience.
Making sure you apply sufficient strength while tufting helps keep the fabric intact. Low pressure leads to weak impact on the cloth, causing unwanted gaps. Samuel learned early on that balancing force and speed makes all the difference in creating durable rugs without damage.
Prolonged focus on one spot causing material strain
Focusing too long on one spot while tufting can strain the material. This strain leads to holes and tears in the cloth. It’s like when you keep pulling at a single thread in a sweater.
Soon, there’s a hole where the thread used to be. In tufting, this means your fabric weakens as you work more on that same spot.
To avoid weakening your masterpiece, move around more. Don’t stay in one place for too long. This keeps the fabric strong and helps prevent damage. Now, let’s talk about how to fix those tears if they happen.
Recommended Practices to Repair Tears
Fixing tears in tufted cloth needs careful steps. First, work on the rug until you finish it; then, accurately measure any tears or holes to find the best way to mend them.
Continue working on the rug until completion
Finish your tufting project even if you find holes. This makes fixing easier later. Keep adding yarn until the rug is done. After that, you can deal with any repairs needed. This method helps manage the repair process better.
Measure tears carefully before repairing them. You can choose to glue patches or sew them for a stronger fix. Each tear needs attention based on its size and location in the rug. Repair work becomes simpler after the entire rug is complete, allowing for a smoother refurbishment process.
Measure the size of the hole or tear accurately
To fix a tear in tufting cloth correctly, first accurately measure the size of the hole or tear. Sam Davity from Urban Tufting always carries a simple ruler to gauge the dimensions.
This step is key for deciding how much material is needed for patching. Without precise measurements, patches may not fully cover the damaged area, leading to more problems down the line.
Accuracy in measurement lays the foundation for a flawless repair. – Sam Davity
For effective patching, conduct a thorough assessment of both width and length. Knowing these numbers assists in cutting out a piece of fabric or yarn of the exact size that will integrate flawlessly with the rest of your piece.
This approach safeguards that repairs are almost imperceptible, preserving the overall aesthetic and structure of your tufted piece.
Use glue to secure patches over holes or sew them for a more permanent solution
Fixing tears in tufting cloth can be easy. First, cut a patch to cover the hole. Then, use glue to attach it. This method is quick and works well for small repairs. For bigger holes or if you need a stronger fix, sewing the patch is better.
Sew around the edges of the patch tightly.
Samuel Davity often uses both methods in his work at Urban Tufting. He finds that glue is great for quick fixes during projects. But when he wants his art to last longer, he sews on patches.
This way, Samuel ensures his tufted pieces are both beautiful and durable.
Using Thin Yarns and Assessing Canvas Tension
Thin yarns can make tufting cloth rip more easily. Test the canvas tension before starting to prevent this problem.
Disadvantages of using thin yarns
Using thin yarns in tufting can lead to problems. These lightweight threads might break easily. This means more time fixing breaks. Thin fibers also make the tufting look sparse. It won’t feel as full or plush with single strands of fine yarns.
Doubling or tripling up on yarns can help, but it adds another step to the process.
With thin strands, colors may not pop as much either. Bright designs lose some vibrancy when narrow gauge yarns are too slim to show true colors well. After considering these issues, let’s talk about how to check if your canvas tension is just right.
Assessing canvas tension using a simple test
Samuel Davity, an expert in tufting, shares a simple test to check if your canvas is tight enough. Throw a coin onto the canvas. If it bounces back, the tension is too loose. This step is key to avoid making holes in your artwork.
He emphasizes that getting the right tension on your canvas plays a big role in keeping it hole-free. Samuel always does this coin bounce test before starting any project at Urban Tufting.
It assures him that his work will not have unwanted gaps or tears caused by incorrect tension.
Utilizing Curves in Design
Using curves in tufting design adds fluidity and movement. It helps break up the monotony of straight lines, making your work stand out.
Tips for using curves in tufting design
Curves can add life to tufting designs, making them stand out. To handle curves well, start with the rug gun speed on low. This gives better control and helps avoid mistakes. Use curves smartly and only when they fit the design.
This method has worked in various textile art projects.
Also, practice makes perfect in mastering curve use in carpet weaving. The more one works with different shapes, the easier it becomes to include them effectively in patterns. This technique is vital for those passionate about enhancing surface embellishment through unique design principles.
Discovering Rips or Holes While Working
Finding rips or holes while tufting can halt your progress. This section covers ways to fix those problems and keep going.
Patching holes after completing tufting
Discovering rips or holes while working on a tufting project can be frustrating. Luckily, there are simple ways to fix them and get your project back on track.
- Finish the tufting piece before starting any repairs.
- Measure the hole or rip carefully to know how big your patch needs to be.
- Cut a piece of fabric that matches your project for the patch.
- If using glue, apply a thin layer to one side of the fabric patch.
- Carefully place the patch over the hole and press down firmly.
- Allow the glue to dry completely before moving on.
- For sewing, use a needle and thread that match your project in color.
- Start stitching around the edges of the hole to secure the patch in place.
- Make sure stitches are small and close together for a strong hold.
Moving onto assessing canvas tension can also improve your tufting projects.
Gaining more experience to mitigate frustrations
Gaining more experience is key in dealing with the frustrations of discovering rips and holes while working on tufting projects. Samuel Davity, through his work at Urban Tufting, found that regular practice significantly reduces problems.
This comes from mastering techniques over time. Improving skills makes it easier to avoid common mistakes.
Learning from each mistake helps build knowledge and enhances expertise in tufting. Developing competence this way increases proficiency in creating beautiful pieces without frequent issues.
Each project becomes a chance to refine abilities and grow capabilities, making the process smoother with every new rug or piece created.
Conclusion
Fixing tufting rips brings many benefits. Simple steps can prevent and repair these issues. Tools like glue and sewing offer permanent fixes. Experience helps avoid future mistakes.
Keeping at it leads to beautiful, lasting rugs.
FAQs
1. What is the ripping problem in tufting and how does it occur?
The ripping problem in tufting refers to when the fabric gets torn or damaged during the tufting process. This can happen due to various reasons such as using incorrect tools, applying too much force, or working with delicate materials.
2. How can I fix a ripped piece of tufted fabric?
To repair a ripped piece of tufted fabric, you need to carefully remove the damaged threads without causing further harm. Next, replace them with new ones that match your fabric’s color and texture. It’s crucial here to use appropriate tools and techniques so as not to cause more damage.
3. Are there any tips for preventing rips while I’m doing my tufting work?
Yes! To avoid rips while you’re working on your project, ensure that you’re using suitable tools for your specific type of material and try not to apply excessive force when inserting needles into fabrics. Additionally, always keep your workspace clean and organized which helps prevent accidental snags or tears.
4. Can all types of fabrics be repaired if they get ripped during the tufting process?
While most fabrics can be fixed if they rip during the tufting process, some delicate materials may be harder to mend than others due their fragility or unique textures.


